In C#, a constructor is the member of the class and is automatically invoked once the object of the class is created. It is like a method in a program and is used for the initialization of the data members of a newly created object.
class Example
{
  .......
  // Constructor
  public Example() {
    //Object initialization
  }
  .......
}


//creating oject
Example obj = new Example();
Two types of C#constructors
Default constructor
Parameterized constructor
Default Constructor in C#
A constructor without any parameters is called a default constructor and is invoked at the time of creating the object of the class.
Example: Default C# Constructor
using System;

   public class Student
   {
      public Student()
      {
          Console.WriteLine("Constructor Called");
      }
      public static void Main(string[] args)
      {
          Student std1 = new Student();
          Student std2 = new Student();
      }
   }
Output:
Constructor Called Constructor Called
As you can see, that the constructor is called every time we create a new object of the class. And since it is a default constructor, it has no parameter.
Parameterized Constructor in C#
A Constructor having a specific number of parameters is called Parameterized Constructor. Passing parameters is useful when you want to assign a different initial value to distinct objects.
Example: Parameterized C# Constructor
using System;

 public class Student
 {
     public int roll;
     public String name;
     public float score;

     //constructor
     public Student(int r, String n, float s)
     {
         roll = r;
         name = n;
         score = s;
     }
     public void display()
     {
         Console.WriteLine(roll + " " + name + " " + score);
     }
 }

 class StudenInfo
 {
    public static void Main(string[] args)
    {
       Student std1 = new Student(1101, "Shaun", 80.5f);
       Student std2 = new Student(1102, "Garen", 90f);

       std1.display();
       std2.display();

    }
 }
Output:
1101 Shaun 80.5
1102 Garen 90
As you can see the student details are initialized and displayed for every object created for the Student class in a program.
C# is an object-oriented programming language and classes and objects are the fundamental components of OOP’s. Everything in C# is built upon classes and objects. Let us learn classes and objects with an example.
C# Class
A class is a user-defined blueprint or prototype for creating Objects. We can say that it is a template for creating objects for a class.
A class can have fields, methods, constructors, etc and these members can be accessed and used by creating an instance of that class that is an object.
Example for defining a class with few fields and methods in C#.
public class Rectangle
 {

    //field
    int length, breadth;
    int area;

    // method
    public void area() {
       area = length * breadth;
    }
 }
The definition of the class starts with the keyword class followed by a class name. The body of the class is enclosed within the curly brace. All the members of the class are declared within the body of the class as shown above.
C# Object
Objects are real-world entities. Example bike, Lamp, pen, table, etc. It is an instance of a class that has states and behavior. It can be physical and logical.
The Class members are accessed by creating an object of that class and is a runtime entity created at runtime.
To create an object of a class we use the keyword new.
//creating an object of class Rectangle
Rectangle rect = new Rectangle();
In the above code, Rectangle is a type and rect is a reference variable that refers to the instance of the Rectangle class. And the new keyword allocates the memory at runtime in a program.
Example1: C# Class and Object
Let see an example where we create a class Rectangle and have a method calculate the area and also display the area value.
using System;

public class Rectangle
 {
    //field
    int length = 2, breadth = 3;
    int area;

    // method
    public void areaFunc()
    {
       area = length * breadth;
       Console.WriteLine("Area: {0}", area);
    }

    public static void Main(string[] args)
    {
        Rectangle rect = new Rectangle(); //object
        rect.areaFunc();
     }
 }
Output:
Area: 6
Example1: C# Class and Object
In the example below, we will put the main method at the different classes and create multiple objects for the Student class. Also, display the student information.
using System;

public class Student
 {
    //field
    int roll = 2;
    String name;

    //Constructor
    public Student (int r, String str)
    {
        this.roll = r;
        this.name = str;
    }

    // method
    public void display()
    {
       Console.WriteLine("Roll: {0}, Name: {1}", roll, name);
    }

 }

 class StudentInfo
 {
    public static void Main(string[] args)
    {
        Student std1 = new Student(1, "John Mac"); //object
        Student std2 = new Student(2, "Ryan Blanc"); //object

        std1.display();
        std2.display();
     }
 }
Output:
Roll: 1, Name: John Mac
Roll: 2, Name: Ryan Blanc
Also, a constructor is included in order to initialize the class field.
An exception is an event or an error that arises during the execution of a program i.e. during run–time. The occurrence of an exception in a program disrupts the normal flow of instructions.
So to handle such errors, we use exception handlers. If we do not handle the exception properly then the program may terminate. We can catch an exception through exception handling and our program will not completely terminate.
The main advantage of exception handling is to ensure that even when an exception occurs, the program’s flow doesn’t break.
C++ Exception Handling Keywords
C++ provides three keywords to perform exception handling. They are:
try: The try block identifies the block of code for which the exception will be activated. It is followed by a catch block.
catch: The catch indicates the cathching of an exception where you want to catch the error accuring in the program.
throw: throw keyword is used to throw an exception when a problem arises in a program.
try/catch in C++
Assume that the block of code will cause an error and you want to catch that exception. The try and catch block will help you to do that. You place a code inside the try block which you think causing the problem and catch the statement to catch the exception.
We can place a multiple catch statement on different types of exceptions that may arise by try block code.
Example: C++ try/catch
Use of try, catch and throw keywords in a C++ program.
#include <iostream>
using namespace std;

double division(int x, int y)
{
  if (y == 0)
    throw "Division by Zero attempted.";

  return (x / y);
}

int main()
{
  int a = 11;
  int b = 0;
  double c = 0;

  try
  {
    c = division(a, b);
    cout << c << endl;
  }

  catch (const char *ex)
  {
    cerr << ex << endl;
  }

  return 0;
}
Output:
Division by Zero attempted.
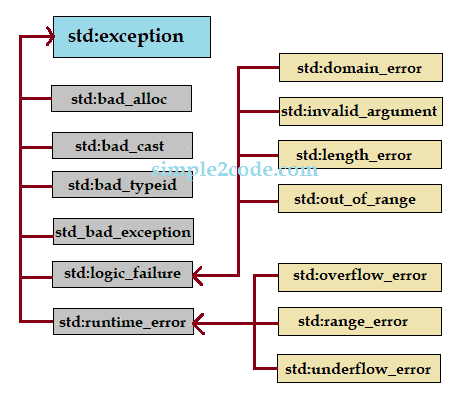
C++ Standard Exceptions
C++ provides a list of standard exceptions defined in <exception> class that we can use in a program.
These exceptions and descriptions are listed in the table below.
Exception
Description
std::exception
This is an exception and the parent class of all standard C++ exceptions.
std::bad_alloc
This can be thrown by a keyword new.
std::bad_cast
This can be thrown by dynamic_cast.
std::bad_exception
A useful device for handling unexpected exceptions in C++ programs.
std::bad_typeid
An exception thrown by typeid.
std::logic_error
This exception is theoretically detectable by reading code.
std::domain_error
This is an exception thrown after using a mathematically invalid domain.
std::invalid_argument
This exception is thrown for using invalid arguments.
std::length_error
This exception is thrown after creating a big std::string.
std::out_of_range
Thrown by at method.
std::runtime_error
This is an exception that cannot be detected via reading the code.
std::overflow_error
This exception is thrown after the occurrence of a mathematical overflow.
std::range_error
This exception is thrown when you attempt to store an out-of-range value.
std::underflow_error
This exception is thrown after the occurrence of mathematical underflow.
User-Defined Exceptions
The C++ std::exception class allows us to define objects that can be thrown as exceptions. This new exception can be defined by overriding and inheriting the exception class functionality. This class has been defined in the <exception> header.
Example: user-defined exception in c++
#include <iostream>
#include <exception>
using namespace std;

class ExceptionEg: public exception
{
  virtual
  const char *what() const
  throw ()
  {
    return "Occurance of new exception";
  }
};

int main()
{
  ExceptionEg newEx;
  try
  {
    throw newEx;
  }

  catch (exception & ex)
  {
    cout << ex.what() << '\n';
  }

  return 0;
}
A string is a sequence of characters that is an object of std::string class in C++. Memory to a string is allocated dynamically that is we can assign memory during runtime as required. Various operations are performed on a string such as concatenation, comparison, conversion, etc.
C++ supports two types of string in a program.
C-style character string.
String class type (Standard C++ Library).
C-style character string
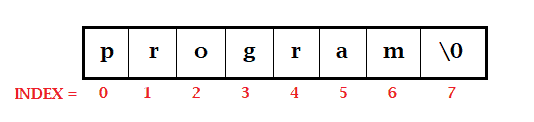
C-style was introduced in the C programming language and is continued to be supported by C++. These one-dimensional strings are stored in a series in an array of type char and are terminated by a null character ‘\0’.
Memory presentation of the character array in C/C++:
Declaring C-style string:
char name[5] = {'A', 'l', 'e', 'x', '\0'};
The above character for a string ‘Alex‘. But notice that the number f character is 4 but we declare the size 5 as because the last space is reserved for the null character in order to terminate the string.
Although, we can also initialize the above in the following way.
char name[] = "John";
Note that here, we do not have to add a null character at the end. The C++ compiler will automatically place the ‘\0‘ at the end of the string.
Example:C++ program to read and display the string
#include <iostream>
using namespace std;

int main()
{
    char str[100];

    cout << "Enter a string: ";
    cin.get(str, 100);

    cout << "Entered String is: " << str << endl;
    return 0;
}
Enter a string: This is simple2code.com Entered String is: This is simple2code.com
Notice that we use cin.get in order to get the string from the user that contains white spaces in a string. It takes two argument name of a string and the size of an array.
String class type
The standard C++ library provides a string class that supports the various operation on a string. It is written as std::string.
Also, instead of char type, we create a string object to hold the string. It does not require fined length like in char type, we can extend the character according to our need.
Now in order to use the class to perform various operations on a string, we need to include the following header file.
#include<cstring>
Example:C++ program to read and display the stringusing string object
Before performing on class type with some operation, let us first see a simple example of string using its object.
#include <iostream>
using namespace std;

int main()
{
    string str;

    cout << "Enter a string: ";
    getline(cin, str);

    cout << "Entered String is: " << str << endl;
    return 0;
}
Enter a string: This is simple2code.com Entered String is: This is simple2code.com
Notice that to get the string from the user, we use getline() function that takes two arguments – input stream (cin) and location of the line to be stored (str).
C++ String Functions
There are different functions provided by the string class to manipulate strings in a program. The cstring class defines these functions and we need to include cstring header file in a program. Let us see some of these functions with examples.
Function
Description
strcpy(str1, str2);
It copies string2 content in string1.
strcmp(str1, str2);
It is a comparison function. returns 0, if str1 = str2 returns less than 0, if str1<str2 returns greater than 0, if str1>str2
strcat(str1, str2);
It joins str2 into the end of str1.
strlen(str);
It returns the length of the string passed.
Example of the above string function in C++
#include <iostream>
#include <cstring>
using namespace std;

int main()
{
    char str1[10] = "Mark";
    char str2[10] = "John";
    char str3[10];
    int  len;

    //copy string2 to string3
    strcpy(str3, str2);
    cout << "strcpy( str3, str2) : " << str3 << endl;

    //concatinate string1 and string2
    strcat(str1, str2);
    cout << "strcat( str1, str2): " << str1 << endl;

    //length of a string1
    len = strlen(str1);
    cout << "strlen(str1) : " << len << endl;

    //compare: returns 0 since str2 = str3
    cout << "strcmp(str2, str3) : " << strcmp(str2, str3) << endl;

    return 0;
}
We pass the string in a similar way like we pass an array to a function. We will see an example where we will learn to pass two different strings in a function.
It is a basic example, where we create two print functions and take the user input for two different strings.
As you have studied in C preprocessor before, C++ preprocessor also has the same exact concept of it with a change in coding.
As the “pre” means beforehand, similarly it means processing something before passing it on further. The preprocessor is a program that processes the source program before it is passed to the compiler. So we can say that it is a separate process in the compilation.
Preprocessor gives specific features called directives. All preprocessor directive begins with “#“ symbol and do not need to be end with senicolon (;). We have seen the use of #include in the program till now.
The following are preprocessor directives:
Macro expansion
File inclusion
Conditional Compilation
Miscellaneous directives
Macro Definition
macro is defined by #define in a program. It is used to define some constant in a program that can be used anywhere during the entire program. This constant becomes global value.
#define PI 3.1415
This statement is called ‘macro definition’ or more commonly, just a ‘macro’. Its purpose: during preprocessing, the preprocessor replaces every occurrence of PI in the program with a 3.1415 value.
You may try this program:
#include <iostream>
using namespace std;

#define PI 3.14159 //macro

int main ()
{
   float radius = 2.5;
   cout << "Area of a circle :" << PI * radius *radius << endl;

   return 0;
}
Area of a circle :19.6349
File inclusion
#include is used to include some files into the program. These are usually header files, but sometimes maybe any text file. The command looks something like this:
#include <iostream>
iostream is the header file that contains the library function useful to the program.
Conditional Compilation
The C++ preprocessor provides a series of directives for conditional compilation: #if, #elif, #else, #ifdef, #ifndef, and #endif. These commands cause the preprocessor to include or exclude sections of the source code from compilation depending on certain conditions.
Conditional compilation is used for three main purposes:
Optionally include debugging code
Enclose non-portable code
Guard against multiple inclusion of header files.
Syntax:
#ifdef, #endif, #if, #else, #ifndef
#ifndef
#ifndef TEXT
   #define TEXT "Hello World"
#endif
It tells the C Preprocessor to define TEXT only if TEXT isn’t already defined.
#ifdef Directive
#ifdef MACRO
   // conditional codes
#endif
#if expression
   conditional codes if expression is non-zero
#else
   conditional if expression is 0
#endif
You can also add nested conditional to your#if...#else using #elif
#if expression
    // conditional codes if expression is non-zero
#elif expression1
    // conditional codes if expression is non-zero
#elif expression2
    // conditional codes if expression is non-zero
#else
    // conditional if all expressions are 0
#endif
Other directives
#undef is used to undefine a defined macro variable.
#undef  FILE_SIZE
#define FILE_SIZE 38
It tells the C Preprocessor to undefine existing FILE_SIZE and define it as 38.
#pragma startupand #pragma exit: These are used to call a function before and after the main function in a C++ program.
Suppose there is a function called abc() in your code and you are also using some library that has the function with the same name as abc(). Now while executing these functions, the compiler will not know which one to execute among two abs() functions. In such cases namespace comes into action.
A namespace is used to overcome the above situation in a program. It is used as additional information for functions, classes, etc. It allows us to organize the elements of the program into a logical group so that the collision of multiple libraries can be prevented.
Defining a Namespace
The keyword “namespace” is used to define the namespace class and to call prepend (::) the namespace such as:
namespace namespace_name
{
   void func() {
        // body of function
    }
}

//to call, inside main
namespace_name::func();
It could be variable or function in a program.
Example of namespace in C++
#include <iostream>
using namespace std;

namespace space_one
{
   void funcHello() {
      cout << "Hello space_ONE" << endl;
   }
}

namespace space_Two
{
   void funcHello() {
      cout << "Hello space_Two" << endl;
   }
}

int main ()
{
   //Calling function with their namespace
   space_one::funcHello();
   space_Two::funcHello();

   return 0;
}
Output:
Hello space_ONE
Hello space_Two
C++ program for a namespace with the use of directive.
Here we use using keyword and avoid prepending a namespace.
#include <iostream>
using namespace std;

namespace space_one
{
   void funcHello() {
      cout << "Hello space_ONE" << endl;
   }
}

namespace space_Two
{
   void funcHello() {
      cout << "Hello space_Two" << endl;
   }
}

using namespace space_one;
int main ()
{
   //Calling function with their namespace
   funcHello();

   return 0;
}
Till now, we have seen the use of iostream standard library that provides us with cin and cout methods to take input and print output respectively. Here we will learn about another library to handle files.
Files are used to store the data permanently in the storage device and a standard C++ library called fstream allows us to work with files.
fstream Library
The fstream Library provides us with three classes that help us to read and write from the files in C++. And these classes are:
fstream: This class generally represents a file stream. It is used to create files, write or read data from or to the files.
ifstream: This class represents an input stream and used to read the data from the files.
ofstream: This class represents an output stream and used to write the data to the files.
Open a file
We can not perform any operation on file without opening it first. If you want to perform a write operation on the file then open the file using fstream or ofstream objects. If you want to perform a read operation on the file then open the file using ifstream object.
There is a function called open() which is a member of all three classes (fstream, ifstream, and ofstream) and is used to open a file. The syntax to open a file is:
open (file_name, mode);
file_name: This simply indicates the name of the file to be opened.
mode: It defines the mode in which the file should be opened. It is opetaional. There are several modes given below.
Mode
Description
ios:: app
Append mode. The output sent to the file is appended to it.
ios::ate
At end mode. It opens the file for the output then moves the read and write control to the end of the file.
ios::in
Input mode. It opens the file for reading.
ios::out
Output mode. It opens the file for writing.
ios::trunc
Truncate mode. If a file exists then before opening the file its contents are discarded.
Also while opening a file we can combine the above modes together using OR operator (|) such as:
As stated above the mode in an open() function is optional and if we do not provide the mode then the following default mode will be assigned to the respective classes.
Class
Mode
ifstream
ios::in
ofstream
ios::out
fstream
ios::in | ios::out
Close a file
Once the program is terminated in C++, it automatically closes the opened files. However, it is recommended to practice closing a file every time you open a file.
Just like a function open() is there to open a file, the fstream, ofstream, and ifstream objects also have a close() function. The syntax is pretty simple.
void close();
Example: C++ program to open and close a file
#include <iostream>
#include <fstream>
using namespace std;

int main()
{
   fstream file;
   file.open("file.txt", ios::out);

   //check if file creation is failed or not
   if (!file)
   {
      cout << "File is not created!";
   }
   else
   {
      cout << "File is created successfully.";
      file.close();
   }

   return 0;
}
//Output File is created successfully.
After successful execution of the above code, you may check the directory where your c++ program file is present, there you will find a new text file with file.txt name.
Writing to a file
Below is the example of C++ to write to a file. We will write to a text file called file.txt using the stream insertion operator (<<). Here we use ofstream or fstream object instead of the cout object.
Example: C++ to write in a file.
#include <iostream>
#include <fstream>
using namespace std;

int main()
{
  ofstream file("file.txt");

  //check if file is opened or not
  if (file.is_open())
  {
    file << "This is Simple2Code.com.\n";
    file << "Learn Programming Language.\n";
    file.close();
  }
  else
  {
    cout << "File failed to open";
  }

  return 0;
}
After successful execution of the program, you can open your file.txt and you will see the following sentence inside that file.
This is Simple2Code.com.
Learn Programming Language.
Reading from a file
Below is the example of C++ to read from a file. We will from a text file called file.txt using the stream extraction operator (>>). Here we use ifstream or fstream object instead of the cin object.
Example: C++ to read from a file.
Now before running the program, you must create a file and write some text in it as for this example, we created a file called file.txt and wrote the following text in it. This is Simple2Code.com. Learn Programming Language.
#include <iostream>
#include <fstream>
using namespace std;

int main()
{
  string str;
  ifstream file("file.txt");

  //check if file is opened or not
  if (file.is_open())
  {
    while (getline(file, str))
    {
      cout << str << endl;
    }

    file.close();
  }
  else
  {
    cout << "File failed to open";
  }

  return 0;
}
After successful execution of the program, you will see the following output (String from opened file.)
This is Simple2Code.com.
Learn Programming Language.
Example: Read and Write in C++
Here, we will see an example where we will write some data in a text file called file.txt and then read those from the file using C++ FileStream. To write the data, we will take user input.
#include <iostream>
#include <fstream>
using namespace std;

int main()
{
  char data[100];

  //WRITE mode
  ofstream writeFile;
  writeFile.open("file.txt");

  cout << "Writing to a file:" << endl;
  cout << "Enter your name: ";
  cin.getline(data, 100);

  writeFile << data << endl;  //writing the entered data

  cout << "Enter your age: ";
  cin >> data;
  cin.ignore();

  writeFile << data << endl;  //writing the entered data

  writeFile.close();   //file closed

  //READ mode
  string str;
  ifstream readFile;
  readFile.open("file.txt");

  cout << "\nReading from a file:" << endl;
  while (getline(readFile, str))
  {
    cout << str << endl;
  }

  readFile.close();  //file closed

  return 0;
}
After Execution, a file name file.txt will be created and the following entered will be present in that file.
Writing to a file: Enter your name: John Markson Enter your age: 29
An enumeration is a user-defined type that consists of a set of named integral constants. These constants are fixed constant. The keyword enum is used to define these data types.
Syntax of enums
enum enum_name{const1, const2, ....... };
enum_name: Name of the enum given by the user.
const1, const2 : These are the value of type enum_name.
Let us see an example to define enum.
enum season { spring, summer, autumn, winter };
The above is the enum for the season, spring, summer, autumn and winter are the types of the season and by default, the value starts in increasing order from zero such as spring is 0, summer is 1, autumn is 2 and winter is 3.
We can change the default values of enum and assign the required value in the following way.
enum season { spring = 01, summer = 04, autumn = 06, winter=09 };
How to declarean enum variable
We can declare an enum variable in two different ways:
We can declare it at the time of defining enum, just add the enum variable name at the end and before the semicolon.
Another way is we can create it inside the main function. Both ways are shown below.
//first way
enum enum_name{const1, const2, ....... } variable_name;


//Second way
enum enum_name{const1, const2, ....... };
int main()
{
  enum_name variable_name;
}
Example of enumeration in c++
1. Let us see an example of enum in c++ with the first way of declaring variables.
2. Another example of enum, where we declare the variable inside the main function. Also, we change the default values of enums.
#include <iostream>
using namespace std;

enum colors{red = 12, green = 24, blue = 36};

int main()
{
   colors color;
   color = green;

   cout << "Green: " << color;

   return 0;
}
Output:
//Output
Green:  24
Why use enum in C++
We use enum when we want to assign the variable with one of the possible sets of values. These values cannot be changed, if we try to assign different values to this variable the compiler generates an error. Thus, it improves safety and increases compile-time checking.
There is another use of enum that is in a switch case statement. Also, enum can be traversed.
The relation of structure and function in C++ is that just like any other argument passed in a function, a structure can also be passed.
Passing structure to function in C++
We can pass and access the structure to function as an argument in a program. It is similar to the way we pass a normal argument to a function. And it is also returned from a function just like any other argument.
The output of this program is the same as the output of the above program.
In this program, the structure variable s stores the returned value from returnInfo() function where value is provided to structure members (s = returnInfo(s);).
After that, the s is passed to display() function where the information os student is displayed.
A pointer in C++ can also be created for a user-defined type like structure. It is similar to those pointers that point to the native data types such as int, float, etc.
Enter meters value: 8
Enter centimeters value: 25
Distance = 8m 25cm
Also, as you can see in the above program we use . (dot operator) to access members from the pointer. However, -> operator is preferred over . (dot operator) while using pointers. Because . (dot operator) has higher precedence than the * operator that is why we enclose the pointer within brackets (*ptr).meters. Therefore we can conclude the following:
(*ptr).meters is same as ptr->meters
(*ptr).centimeters  is same as ptr->centimeters