Blog

  • Designing a Time Table in HTML using TABLE

    This post covers the time table design in HTML using TABLE.
    Here we will create the time table routine just like the one you had or have in school, designing it, giving it some background color, border but only with the help of HTML.


    HTML code for Time Table

    <html>
    <head>
       <title>School Time Table</title>
    </head>
    <body bgcolor="darkgray">
     <H1 align="center">
            <FONT COLOR="BLUE">SCHOOL TIME TABLE</FONT>
     </H1>
    
    <table border="5" cellspacing="10" align="center">
    
    <tr bgcolor="green">
      <td align="center">Days/Time
      <td>8:30-9:15
      <td>9:15-10:00
      <td>10:00-11:45
      <td>11:45-12:30
      <td>12:30-01:15
      <td>01:15-02:00
      <td>02:45-03:30
      <td>03:30-04:00
    </tr>
    
    <tr bgcolor="#00ffbf">
     <td align="center" bgcolor="#00ff40">MONDAY
     <td align="center">MATHS
     <td align="center">ENGLISH<br>
     <td align="center">SCIENCE<br>
     <td align="center">HISTORY<br>
     <td rowspan="6" align="center" bgcolor="green">R<br>E<br>C<br>E<br>S<br>S
     <td align="center">GEOGRAPHY<br>
     <td align="center">HINDI<br>
     <td align="center">CCA
    </tr>
    <tr bgcolor="#00ffbf">
     <td align="center" bgcolor="#00ff40">TUESDAY
        <td align="center">MATHS
            <td align="center">ENGLISH<br>
            <td align="center">HINDI<br>
            <td align="center">HISTORY<br>
            
            <td align="center">GEOGRAPHY<br>
            <td align="center">MATHS<br>
            <td align="center">LIBRARY
    </tr>
    <tr bgcolor="#00ffbf">
     <td align="center" bgcolor="#00ff40">WEDNESDAY
        <td align="center">MATHS
            <td align="center">GAMES<br>
            <td align="center">SCIENCE<br>
            <td align="center">HISTORY<br>
            
            <td align="center">ENGLISH<br>
            <td align="center">HINDI<br>
            <td align="center">LAB
    </tr>
    <tr bgcolor="#00ffbf">
     <td align="center" bgcolor="#00ff40">THURSDAY
        <td align="center">MATHS
            <td align="center">ENGLISH<br>
            <td align="center">SCIENCE<br>
            <td align="center">MATHS<br>
            
            <td align="center">GEOGRAPHY<br>
            <td align="center">HINDI<br>
            <td align="center">CCA
    </tr>
    <tr bgcolor="#00ffbf">
     <td align="center" bgcolor="#00ff40">FRIDAY
        <td align="center">MATHS
            <td align="center">LIBRARY<br>
            <td align="center">SCIENCE<br>
            <td align="center">ENGLISH<br>
           
            <td align="center">MATHS<br>
            <td align="center">HINDI<br>
            <td align="center">LAB
    </tr>
    <tr bgcolor="#00ffbf">
     <td align="center" bgcolor="#00ff40">SATURDAY
        <td align="center">MATHS
            <td align="center">ENGLISH<br>
            <td align="center">SCIENCE<br>
            <td align="center">HISTORY<br>
          
            <td align="center">GAMES<br>
            <td align="center">YOGA<br>
            <td align="center">CCA
    </tr>
    </body>
    </html>

    Output: school time table in html

    HTML

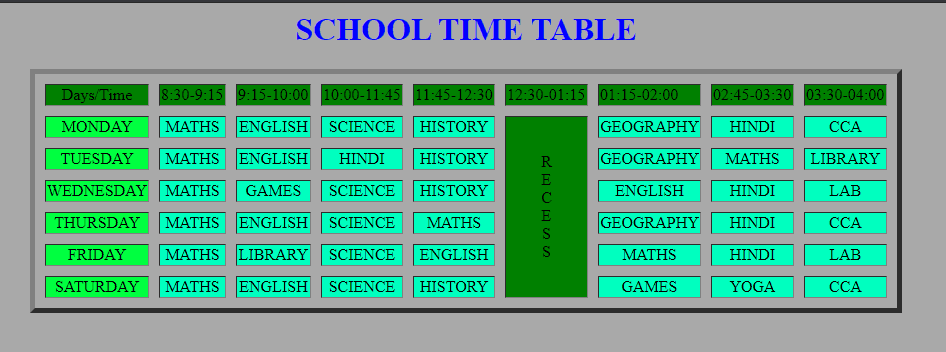
    You can change the design as you want, change the color and practice with it.
    We hope this post on time table design in html helped you.


  • HTML Code for Registration Form

    This article covers the topic of HTML Code for Registration Form. In this article, you will learn to create two separate registration forms in HTML using TABLE.
    Registration form in HTML with source code

    Two types of forms we will learn in this articles are:

    • Student Registration Form
    • Employment Registration Form

    1. Student Registration form in HTML using table

    As we all have filled the student registration form during admission or registration and we know the basics knowledge of what question field it contains. So we will create a basic type form and once you understand it you can modify it as needed. Each field in code is commented to make you understand easily.

    Example of Student Registration form in HTML using the table:

    HTML Code for student Registration Form:

    source code:

    <html>
    <head>
    <title>Student Registration Form</title>
    
    </head>
     
    <body bgcolor ="lightblue">
     <h1 align = "left">STUDENT REGISTRATION FORM</h1>
    
     
    <table align="left" cellpadding = "2">
     
    <!-- NAME OF THE APPLICANT -->
    <tr>
        <td>FIRST NAME:</td>
         <td><input type="text" name="First_Name" maxlength="30"/>
        </td>
    </tr>
     
    
    <tr>
    <td>LAST NAME:</td>
    <td><input type="text" name="Last_Name" maxlength="30"/>
    </td>
    </tr>
     
    <!-- DATE of BIRTH INFO -->
    <tr>
    <td>DATE OF BIRTH</td>
     
    <td>
     <select name="Birthday_day" id="Birthday_Day">
        <option value="-1">Day:</option>
        <option value="1">1</option>
        <option value="2">2</option>
        <option value="3">3</option>
        
        <option value="4">4</option>
        <option value="5">5</option>
        <option value="6">6</option>
        <option value="7">7</option>
        <option value="8">8</option>
        <option value="9">9</option>
        <option value="10">10</option>
        <option value="11">11</option>
        <option value="12">12</option>
        
        <option value="13">13</option>
        <option value="14">14</option>
        <option value="15">15</option>
        <option value="16">16</option>
        <option value="17">17</option>
        <option value="18">18</option>
        <option value="19">19</option>
        <option value="20">20</option>
        <option value="21">21</option>
        
        <option value="22">22</option>
        <option value="23">23</option>
        <option value="24">24</option>
        <option value="25">25</option>
        <option value="26">26</option>
        <option value="27">27</option>
        <option value="28">28</option>
        <option value="29">29</option>
        <option value="30">30</option>
     
        <option value="31">31</option>
    </select>
     
     <select id="Birthday_Month" name="Birthday_Month">
        <option value="-1">Month:</option>
        <option value="January">Jan</option>
        <option value="February">Feb</option>
        <option value="March">Mar</option>
        <option value="April">Apr</option>
        <option value="May">May</option>
        <option value="June">Jun</option>
        <option value="July">Jul</option>
        <option value="August">Aug</option>
        <option value="September">Sep</option>
        <option value="October">Oct</option>
        <option value="November">Nov</option>
        <option value="December">Dec</option>
    </select>
     
     <select name="Birthday_Year" id="Birthday_Year">
     
        <option value="-1">Year:</option>
        <option value="2012">2012</option>
        <option value="2011">2011</option>
        <option value="2010">2010</option>
        <option value="2009">2009</option>
        <option value="2008">2008</option>
        <option value="2007">2007</option>
        <option value="2006">2006</option>
        <option value="2005">2005</option>
        <option value="2004">2004</option>
        <option value="2003">2003</option>
        <option value="2002">2002</option>
        <option value="2001">2001</option>
        <option value="2000">2000</option>
        
        <option value="1999">1999</option>
        <option value="1998">1998</option>
        <option value="1997">1997</option>
        <option value="1996">1996</option>
        <option value="1995">1995</option>
        <option value="1994">1994</option>
        <option value="1993">1993</option>
        <option value="1992">1992</option>
        <option value="1991">1991</option>
        <option value="1990">1990</option>
        
        <option value="1989">1989</option>
        <option value="1988">1988</option>
        <option value="1987">1987</option>
        <option value="1986">1986</option>
        <option value="1985">1985</option>
        <option value="1984">1984</option>
        <option value="1983">1983</option>
        <option value="1982">1982</option>  
        <option value="1981">1981</option>
        <option value="1980">1980</option>
     </select>
    </td>
    </tr>
    
    <!-- GENDER -->
    <tr>
        <td>GENDER:</td>
        <td>
        Male <input type="radio" name="Gender" value="Male" />
        Female <input type="radio" name="Gender" value="Female" />
        </td>
    </tr>
    
     
    <!-- ADDRESS -->
    <tr>
    <td>ADDRESS:<br /><br /><br /></td>
    <td><textarea name="Address" rows="4" cols="30"></textarea></td>
    </tr>
    
    <!-- CITY -->
    <tr>
        <td>DISTRICT:</td>
         <td><input type="text" name="City" maxlength="30" />
        </td>
    </tr>
     
    <!-- CITY -->
    <tr>
      <td>CITY:</td>
       <td><input type="text" name="City" maxlength="30" />
      </td>
    </tr>
     
    <!-- PINCODE -->
    <tr>
      <td>PIN CODE:</td>
        <td><input type="text" name="Pin_Code" maxlength="6" />
        (6 digit number)
      </td>
    </tr>
     
    <!-- STATE -->
    <tr>
      <td>STATE:</td>
       <td><input type="text" name="State" maxlength="30" />
       </td>
    </tr>
     
    <!-- COUNTRY -->
    <tr>
      <td>COUNTRY:</td>
       <td><input type="text" name="Country" value="" readonly="readonly" /></td>
    </tr>
     
    <!-- EMAIL ID and MOBILE NUMBER -->
    <tr>
        <td>EMAIL ID:</td>
        <td><input type="text" name="Email_Id" maxlength="100" /></td>
    </tr>
      
    <tr>
      <td>MOBILE NUMBER:</td>
       <td>
        <input type="text" name="Mobile_Number" maxlength="10" />
        (Enter 10 digit number)
      </td>
    </tr>
    </table>
    
    <table align="left" cellpadding = "2">
    <!-- ENTER APPLICANT QUALIFICATION -->
    <tr>
        <td><br>QUALIFICATION DETAILS:</td>
    </tr>
    
    <tr>
    <td>
    <table>
    
    <tr>
      <td align="center"><b>Sl.No.</b></td>
      <td align="center"><b>Examination</b></td>
      <td align="center"><b>Name of the Board</b></td>
      <td align="center"><b>Marks Obtained</b></td>
      <td align="center"><b>Year of Passing</b></td>
      <td align="center"><b>Percentage</b></td>
    </tr>
     
    <tr>
        <td>1</td>
        <td>Class X:</td>
        <td><input type="text" name="BoardName" maxlength="30" /></td>
        <td><input type="text" name="MarksObtained" maxlength="30" /></td>
        <td><input type="text" name="YearrOfPassing" maxlength="30" /></td>
        <td><input type="text" name="percentage" maxlength="30" /></td>
    </tr>
     
    <tr>
        <td>2</td>
        <td>Class XII:</td>
        <td><input type="text" name="BoardName" maxlength="30" /></td>
        <td><input type="text" name="MarksObtained" maxlength="30" /></td>
        <td><input type="text" name="YearrOfPassing" maxlength="30" /></td>
        <td><input type="text" name="percentage" maxlength="30" /></td>
    </tr>
     
    <tr>
        <td>3</td>
        <td>Graduation:</td>
        <td><input type="text" name="BoardName" maxlength="30" /></td>
        <td><input type="text" name="MarksObtained" maxlength="30" /></td>
        <td><input type="text" name="YearrOfPassing" maxlength="30" /></td>
        <td><input type="text" name="percentage" maxlength="30" /></td>
    </tr>
     
    <tr>
        <td>4</td>
        <td>Masters:</td>
        <td><input type="text" name="Masters_Board" maxlength="30" /></td>
        <td><input type="text" name="Masters_Percentage" maxlength="30" /></td>
        <td><input type="text" name="ClassX_YrOfPassing" maxlength="30" /></td>
        <td><input type="text" name="Masters_YrOfPassing" maxlength="30" /></td>
    </tr>
     
    </table>
     
    </td>
    </tr>
     
    <!-- COURSE applying for -->
    <tr>
     <td><br>COURSES APPLIED FOR: &nbsp;
     
        B.Sc
        <input type="radio" name="Course_BCA" value="BCA">
        B.Com
        <input type="radio" name="Course_BCom" value="B.Com">
        BA
        <input type="radio" name="Course_BSc" value="B.Sc">
        BCA
        <input type="radio" name="Course_BA" value="B.A">
    </td>
    </tr>
     
    <!-- SUBMIT and RESET BUTTON -->
    <tr>
    <td colspan="2" align="center">
    <input type="submit" value="Submit">
    <input type="reset" value="Reset">
    </td>
    </tr>
    </table>
     
    </form>
     
    </body>
    </html>

    2. Employment Registration form in HTML using table

    The employment registration form contains detail fields that we will see how to code in HTML.

    Example of Employment Registration form in HTML using the table:

    HTML Code for Employment Registration Form:

    source code:

    <html>
    <head>
    <title>Employment Registration Form</title>
    
    </head>
     
    <body bgcolor ="lightblue">
     <h1 align = "left">EMPLOYMENT  REGISTRATION FORM</h1>
    
     
    <table align="left" cellpadding = "2">
     
    <!-- NAME OF THE APPLICANT -->
    <tr>
        <h3>Personal Details</h3>
    </tr>
    <tr>
        <td>FIRST NAME:</td>
         <td><input type="text" name="First_Name" maxlength="30"/>
        </td>
    </tr>
     
    
    <tr>
    <td>LAST NAME:</td>
    <td><input type="text" name="Last_Name" maxlength="30"/>
    </td>
    </tr>
     
    <!-- DATE of BIRTH INFO -->
    <tr>
    <td>DATE OF BIRTH</td>
     
    <td>
     <select name="Birthday_day" id="Birthday_Day">
        <option value="-1">Day:</option>
        <option value="1">1</option>
        <option value="2">2</option>
        <option value="3">3</option>
        
        <option value="4">4</option>
        <option value="5">5</option>
        <option value="6">6</option>
        <option value="7">7</option>
        <option value="8">8</option>
        <option value="9">9</option>
        <option value="10">10</option>
        <option value="11">11</option>
        <option value="12">12</option>
        
        <option value="13">13</option>
        <option value="14">14</option>
        <option value="15">15</option>
        <option value="16">16</option>
        <option value="17">17</option>
        <option value="18">18</option>
        <option value="19">19</option>
        <option value="20">20</option>
        <option value="21">21</option>
        
        <option value="22">22</option>
        <option value="23">23</option>
        <option value="24">24</option>
        <option value="25">25</option>
        <option value="26">26</option>
        <option value="27">27</option>
        <option value="28">28</option>
        <option value="29">29</option>
        <option value="30">30</option>
     
        <option value="31">31</option>
    </select>
     
     <select id="Birthday_Month" name="Birthday_Month">
        <option value="-1">Month:</option>
        <option value="January">Jan</option>
        <option value="February">Feb</option>
        <option value="March">Mar</option>
        <option value="April">Apr</option>
        <option value="May">May</option>
        <option value="June">Jun</option>
        <option value="July">Jul</option>
        <option value="August">Aug</option>
        <option value="September">Sep</option>
        <option value="October">Oct</option>
        <option value="November">Nov</option>
        <option value="December">Dec</option>
    </select>
     
     <select name="Birthday_Year" id="Birthday_Year">
     
        <option value="-1">Year:</option>
        <option value="2006">2006</option>
        <option value="2005">2005</option>
        <option value="2004">2004</option>
        <option value="2003">2003</option>
        <option value="2002">2002</option>
        <option value="2001">2001</option>
        <option value="2000">2000</option>
        
        <option value="1999">1999</option>
        <option value="1998">1998</option>
        <option value="1997">1997</option>
        <option value="1996">1996</option>
        <option value="1995">1995</option>
        <option value="1994">1994</option>
        <option value="1993">1993</option>
        <option value="1992">1992</option>
        <option value="1991">1991</option>
        <option value="1990">1990</option>
        
        <option value="1989">1989</option>
        <option value="1988">1988</option>
        <option value="1987">1987</option>
        <option value="1986">1986</option>
        <option value="1985">1985</option>
        <option value="1984">1984</option>
        <option value="1983">1983</option>
        <option value="1982">1982</option>  
        <option value="1981">1981</option>
        <option value="1980">1980</option>
     </select>
    </td>
    </tr>
    
    <!-- GENDER -->
    <tr>
        <td>GENDER:</td>
        <td>
        Male <input type="radio" name="Gender" value="Male" />
        Female <input type="radio" name="Gender" value="Female" />
        </td>
    </tr>
    
     
    <!-- ADDRESS -->
    <tr>
            <td><h3><br>Permanent  Address</h3><td>
    </tr>
    <tr>
    <td>ADDRESS:<br /><br /><br /></td>
    <td><textarea name="Address" rows="4" cols="30"></textarea></td>
    </tr>
    
    <!-- CITY -->
    <tr>
        <td>DISTRICT:</td>
         <td><input type="text" name="City" maxlength="30" />
        </td>
    </tr>
     
    <!-- CITY -->
    <tr>
      <td>CITY:</td>
       <td><input type="text" name="City" maxlength="30" />
      </td>
    </tr>
     
    <!-- PINCODE -->
    <tr>
      <td>PIN CODE:</td>
        <td><input type="text" name="Pin_Code" maxlength="6" />
        (6 digit number)
      </td>
    </tr>
     
    <!-- STATE -->
    <tr>
      <td>STATE:</td>
       <td><input type="text" name="State" maxlength="30" />
       </td>
    </tr>
     
    <!-- COUNTRY -->
    <tr>
      <td>COUNTRY:</td>
       <td><input type="text" name="Country" value="" readonly="readonly" /></td>
    </tr>
     
    <!-- EMAIL ID and MOBILE NUMBER -->
    <tr>
        <td>EMAIL ID:</td>
        <td><input type="text" name="Email_Id" maxlength="100" /></td>
    </tr>
      
    <tr>
      <td>MOBILE NUMBER:</td>
       <td>
        <input type="text" name="Mobile_Number" maxlength="10" />
        (Enter 10 digit number)
      </td>
    </tr>
    </tr>
    <!-- SKILLS -->
    
    
    </table>
    
    <table align="left" cellpadding = "2">
    <!-- ENTER APPLICANT QUALIFICATION -->
    <tr>
        <td><br><h3>QUALIFICATION DETAILS:</h3></td>
    </tr>
    
    <tr>
    <td>
    <table>
    
    <tr>
      <td align="center"><b>Sl.No.</b></td>
      <td align="center"><b></b></td>
      <td align="center"><b>Name and Location</b></td>
      <td align="center"><b>Degree</b></td>
      <td align="center"><b>Major</b></td>
      <td align="center"><b>Percentage</b></td>
    </tr>
     
    <tr>
        <td>1</td>
        <td>Class XII:</td>
        <td><input type="text" name="name and location" maxlength="30" /></td>
        <td><input type="text" name="Degree" maxlength="30" /></td>
        <td><input type="text" name="Major" maxlength="30" /></td>
        <td><input type="text" name="Percentage" maxlength="30" /></td>
    </tr>
     
    <tr>
        <td>2</td>
        <td>Graduation</td>
        <td><input type="text" name="name and location" maxlength="30" /></td>
        <td><input type="text" name="Degree" maxlength="30" /></td>
        <td><input type="text" name="Major" maxlength="30" /></td>
        <td><input type="text" name="Percentage" maxlength="30" /></td>
    </tr>
     
    <tr>
        <td>3</td>
        <td>Masters:</td>
        <td><input type="text" name="name and location" maxlength="30" /></td>
        <td><input type="text" name="Degree" maxlength="30" /></td>
        <td><input type="text" name="Major" maxlength="30" /></td>
        <td><input type="text" name="Percentage" maxlength="30" /></td>
    </tr>


    </table>
     
    </td>
    </tr>
     
    <tr>
            <td><h4><br>Other SKills</h4>
            &nbsp;<input type="text" name="Other skills" maxlength="30" /></td>
    </tr>
    
    <!-- COURSE applying for -->
    <tr>
     <td><br><h4>Applying for the Post:</h4> &nbsp;
     
        Clerk
        <input type="radio" name="Course_BCA" value="BCA">
        Management Work
        <input type="radio" name="Course_BCom" value="B.Com">
        Assistant
        <input type="radio" name="Course_BSc" value="B.Sc">
        Assistant manager
        <input type="radio" name="Course_BA" value="B.A">
    </td>
    </tr>
     
    <!-- SUBMIT and RESET BUTTON -->
    <tr>
    <td colspan="2" align="center">
    <input type="submit" value="Submit">
    <input type="reset" value="Reset">
    </td>
    </tr>
    </table>
     
    </form>
     
    </body>
    </html>

  • Java program for Sparse Matrix Representation using Array

    This post contain sparse matrix representation in java using array. Before that you may want to learn about the sparse matrix, click the link below.


    Java program for Sparse Matrix Representation using Array

    public class SparseMatrix  
    { 
      public static void main(String[] args) 
        { 
          // sparse matrix of class 5x6 with 6 non-zero values
            int sparseMatrix[][] 
                    = { 
                        {0, 0, 3, 0, 0}, 
                        {0, 0, 4, 0, 8}, 
                        {0, 0, 0, 0, 0}, 
                        {6, 0, 6, 0, 0} 
                    }; 
      
      // Looking for non-zero values in the sparse matrix
            int size = 0; 
            for (int i = 0; i < 4; i++){ 
                for (int j = 0; j < 5; j++){ 
                    if (sparseMatrix[i][j] != 0){ 
                        size++; 
                    } 
                } 
            } 
      
            //result matrix
            int resultMat[][] = new int[3][size]; 
      
            // new matrix 
            int k = 0; 
            for (int i = 0; i < 4; i++){ 
                for (int j = 0; j < 5; j++){ 
                    if (sparseMatrix[i][j] != 0)  
                    { 
                        resultMat[0][k] = i; 
                        resultMat[1][k] = j; 
                        resultMat[2][k] = sparseMatrix[i][j]; 
                        k++; 
                    } 
                } 
            } 
      
            for (int i = 0; i < 3; i++){ 
                for (int j = 0; j < size; j++)
                { 
                  System.out.printf("%d ", resultMat[i][j]); 
                } 
                System.out.printf("\n"); 
            } 
        } 
    }

    Output:

    0 1 1 3 3
    2 2 4 0 2
    3 4 8 6 6

  • Introduction to Sparse Matrix in Data Structure

    In this article, we will learn about Sparse matrix, its use and its different representation.

    What is a sparse matrix?

    A matrix can be defined with a 2-dimensional array with column m and row n represented as m * n matrix. However, there may be a matrix or matrices that may contain less Non-Zero values than Zero values. Such a matrix is known as the Sparse matrix.

    We can say that it is a matrix that contains a few Non-Zero elements.

    Why use Sparse Matrix instead of a simple matrix?

    There are mainly two reasons:

    1. Storage: Sparse matrix allows us to use the memory to store only non-zero elements. So, less storage is required.
    2. Computing time: designing a data- structure that traverses only Non-Zero elements, computing time can be saved.

    Sparse Matrix Representation:

    There are two ways to represent a sparse matrix:

    1. Triplet Representation(Array Representation)
    2. Linked Representation

    1. Triplet Representation(Array Representation)

    It is an array representation where only Non-Zero elements are store in three rows named as:

    • Row: This contains an index number for a row where non-zero elements are situated.
    • Column: This contains an index number for a column where the non-zero element is stored.
    • Value: These contain all the values of Non-Zero elements located at their respective index i.e. rows and columns.
    Sparse matrix

    In the above diagram of matrix size 5* 6, there are 5 non-zero elements (8, 7, 5, 3, 1). The right-hand side table indicates it’s a sparse matrix with Rows, Columns, and Values. Values are the non-zero elements that are present in their particular row and column. Eg. 0th row and 2nd column contain the non-zero element 8 in the sparse matrix. Ans the following shows a similar pattern.

    Triplet Representation(Array Representation) using C++

    #include<iostream>
    
    using namespace std;
    
    int main()
    {
        // sparse matrix of class 5x6 with 6 non-zero values
        int sparseMatrix[5][6] =
        {
            {0 , 0 , 0 , 0 , 4, 0 },
            {0 , 6 , 0 , 0 , 0, 0 },
            {0 , 4 , 0 , 0 , 0, 1 },
            {0 , 0 , 0 , 0 , 0, 5 },
            {0 , 0 , 9 , 0 , 0, 0 }
        };
    
        // Looking for non-zero values in the sparse matrix
        int size = 0;
        for (int row = 0; row < 5; row++){
            for (int column = 0; column < 6; column++){
                if (sparseMatrix[row][column] != 0){
                    size++;
                }
            }
        }    
        //result Matrix
        int resultMat[3][size];
    
       
        int k = 0;
        for (int row = 0; row < 5; row++)
            for (int column = 0; column < 6; column++)
                if (sparseMatrix[row][column] != 0)
                {
                    resultMat[0][k] = row;
                    resultMat[1][k] = column;
                    resultMat[2][k] = sparseMatrix[row][column];
                    k++;
                }
    
        // Displaying result
        cout<<"Triplet Representation of Sparse Matrix : "<<endl;
        for (int row=0; row<3; row++)
        {
            for (int column = 0; column<size; column++)
                cout<<resultMat[row][column]<<" ";
    
            cout<<endl;
        }
        return 0;
    }

    Output of sparse matrix using C++:

    Triplet Representation of Sparse Matrix :
    0 1 2 2 3 4
    4 1 1 5 5 2
    4 6 4 1 5 9

    2. Linked List Representation:

    The Linked list data structure is used to represent a sparse matrix.

    Here, each node has four fields and they are:

    • Row: This contains an index number for a row where non-zero elements are situated.
    • Column: This contains an index number for a column where a non-zero element is stored.
    • Value: These contain all the values of Non-Zero elements located at their respective index i.e. rows and columns.
    • Next Node: This contains the address of the next node.

    C Program to determine if a given matrix is in a sparse matrix or not.

    //(Remainder) Sparse matrix has more zero values than non-zero values.
    
    #include <stdio.h>
     
    void main ()
    {
        static int arr[20][20];
        int i, j, m, n;
        int counter = 0;
     
        printf("Enter the order of the matix \n");
        scanf("%d %d", &m, &n);
        printf("Enter the matix \n");
        for (i = 0; i < m; ++i)
        {
            for (j = 0; j < n; ++j)
            {
                scanf("%d", &array[i][j]);
                if (arr[i][j] == 0)
                {
                    ++counter;
                }
            }
        }
        if (counter > ((m * n) / 2))
        {
            printf("The given matrix is a sparse matrix \n");
        }
        else
            printf("The given matrix is not a sparse matrix \n");
        printf("Number of zeros is %d", counter);
    }

    Output of sparse matrix using C:

    Enter the order of the matix
    3
    3
    Enter the matix
    0
    2
    0
    0
    5
    0
    6
    0
    0
    The given matrix is a sparse matrix
    Number of zeros is 6

  • Java Program for Implementing Queue using Arrays

    This post in queue program in java using array covers insertion, deletion, and display process in queue.

    A queue is a special type of collection created to store the elements in FIFO(first-in-first-out) order.
    It is used to hold the elements before processing it.

    Implementing Queue using Array is simple where we create an array of size n. We also take two variables for the front and rear end. Both will be initialized to 0. The rear is the end of the index element and the front is the index of first element. As it follows FIFO The first element inserted will be deleted first.

    Queue in Java

    Java program on queue using array

    import java.io.*;
    
    class QueueJava
    {
        static int i, front, rear, item, max=5,ch;
        static int ar[]=new int[5];
        QueueJava()
        {
         front = -1;
         rear = -1;
        }
        public static void main(String args[])throws IOException
        {
     
         while((boolean)true)
         {
              
            System.out.println("Choose Options");
            System.out.println("1. To insert");
            System.out.println("2. To delete");
            System.out.println("3. To display");
            System.out.println("4. To Exit");
        
            BufferedReader br=new BufferedReader(new InputStreamReader(System.in));
            ch=Integer.parseInt(br.readLine());
               
             
           switch(ch)
           {
            //Insertion
            case 1:
                if(rear>=max)
                {
                  System.out.println("Queue is Full");
                }
                else
                {
                
                 BufferedReader b = new BufferedReader(new InputStreamReader(System.in));
                 System.out.println("Enter the Element: ");
                 item = Integer.parseInt(b.readLine());
                
               
                 rear=rear+1;
                 ar[rear]=item;
                }
                break;//End of Insertion
                
                
                //Deletion    
            case 2:
                if(front == -1)
                {
                 System.out.println("Queue is Empty");
                }
               else
                {
                 front = front+1;
                 item = ar[front];
                 System.out.println("Deleted Item: "+item);
                }
                break;//End of Deletion
                
                
                //Display
            case 3:
                System.out.println("Elements in the Queue are:");
                for(int i = front+1; i <= rear; i++)
                {
                 System.out.println(ar[i]);
                }
                 break;//End of Display
                 
            case 4:
               break;
            }
          }
        }
    }

    Output Queue using Arrays:

    Queue output

  • Bubble Sort Program in C#

    Sorting is a technique for organizing the elements in an increasing or decreasing order. Bubble Sort is a comparison-based algorithm in which the adjacent elements are compared and swapped to maintain the order.

    Bubble Sort Algorithm

    Bubble sorting is the simplest sorting algorithm that works by comparing two adjacent elements in an array and swapping them if found in the wrong order.

    Bubble sort compares the first element with the next one and if found in the wrong order then that compared element in an array are swapped. This algorithm traverse through the entire element in an array.


    C# Program for Bubble Sort

    There is an unsorted list of arrays given in a program. With the help of bubble sort, we sort those array lists in ascending order.

    Source code: The following is the C# program to implement bubble sort.

    using System;
    
    class BubbleSort
    {
      static void Main(string[] args)
      {
        int[] array = { 56, 67, 2, 675, 11, 45, 8, 765, 18 };
        int temp;
    
        Console.WriteLine("Bubble Sort in C#");
    
        Console.Write("Unsorted Array are: ");
        for (int i = 0; i < array.Length; i++)
          Console.Write(array[i] + " ");
    
        for (int j = 0; j <= array.Length - 2; j++)
        {
          for (int i = 0; i <= array.Length - 2; i++)
          {
            if (array[i] > array[i + 1])
            {
              temp = array[i + 1];
              array[i + 1] = array[i];
              array[i] = temp;
            }
          }
        }
    
        Console.Write("\nAfter Bubble Sorting:");
        foreach(int p in array)
        Console.Write(p + " ");
        Console.Read();
      }
    }

    The Output of Bubble Sort program in C#


    Time Complexity of Bubble Sort:

    • Best case:  O(n)
    • Average case:  O(n^2)
    • Worst case:  O(n^2)

    Selection Sort in C#


  • C# Program to Add Two Matrices

    In this article, you will dd two matrices in C#. For matrix addition, we require two matrices and both the matrices must be a square matrix.

    Explanation:
    We first take the user input for a number of rows and the number of columns. Then passing rows and columns, we take input for two matrices A & B. Then those matrices are added as shown in the following program. And lastly, the result matrix is displayed.


    C# Program for Matrix Addition

    Source Code: The program shows the addition of matrices in C# using classes.

    using System;
    
    class MatrixAddition
    {
      int n, m;
    
     //Input of First Matrix
      public int[, ] GetMatrixA(int n, int m)
      {
        this.n = n;
        this.m = m;
    
        int[, ] matrix = new int[n, m];
        Console.WriteLine("Enter A {0} x {1} matrix", n, m);
        for (int i = 0; i < n; i++)
        {
          for (int j = 0; j < m; j++)
          {
            var input = Console.ReadLine();
            try
            {
              matrix[i, j] = int.Parse(input);
            }
    
            catch (System.Exception ex)
            {
              Console.WriteLine("Invalid input !!");
            }
          }
        }
    
        return matrix;
      }
    
     //Input of Second Matrix
      public int[, ] GetMatrixB(int n, int m)
      {
        this.n = n;
        this.m = m;
    
        int[, ] matrix = new int[n, m];
        Console.WriteLine("Enter B {0} x {1} matrix", n, m);
        for (int i = 0; i < n; i++)
        {
          for (int j = 0; j < m; j++)
          {
            var input = Console.ReadLine();
            try
            {
              matrix[i, j] = int.Parse(input);
            }
    
            catch (System.Exception ex)
            {
              Console.WriteLine("Invalid input !!");
            }
          }
        }
    
        return matrix;
      }
    
     //Addition of two Matrices
      public int[, ] AddMatrix(int[, ] a, int[, ] b)
      {
        int[, ] result = new int[n, m];
        for (int i = 0; i < n; i++)
        {
          for (int j = 0; j < m; j++)
          {
            result[i, j] = a[i, j] + b[i, j];
          }
        }
    
        return result;
      }
    
     //Displaying the result
      public void DisplayMatrix(int[, ] matrix)
      {
        for (int i = 0; i < n; i++)
        {
          for (int j = 0; j < m; j++)
          {
            Console.Write(matrix[i, j] + "\t");
          }
    
          Console.WriteLine("");
        }
      }
    }
    
    class Program
    {
      static void Main(string[] s)
      {
        MatrixAddition matrix = new MatrixAddition();
    
        int m, n;
        Console.WriteLine("Enter Number Of Rows And Columns(must be square matrix) : ");
        m = Convert.ToInt16(Console.ReadLine());
        n = Convert.ToInt16(Console.ReadLine());
    
        int[, ] a = matrix.GetMatrixA(m, n);
        int[, ] b = matrix.GetMatrixB(m, n);
    
        Console.WriteLine("Result of A + B:");
        matrix.DisplayMatrix(matrix.AddMatrix(a, b));
    
      }
    }

    Output:


  • C# Program for Matrix Subtraction

    In this tutorial, we will write a C# program to subtract two matrices. For matrix Subtraction, we require two matrices and both the matrices must be a square matrix.

    Explanation:
    We first take the user input for a number of rows and the number of columns. Then passing rows and columns, we take input for two matrices A & B. Then those matrices are subtracted as shown in the following program. And lastly, the result matrix is displayed.


    C# Program for Matrix Subtraction

    Source Code: Matrix subtraction in C# using classes.

    //Matrix Subtraction
    
    using System;
    
    class MatrixSubtraction
    {
      int n, m;
    
      //Input of First Matrix
      public int[, ] GetMatrixA(int n, int m)
      {
        this.n = n;
        this.m = m;
    
        int[, ] matrix = new int[n, m];
        Console.WriteLine("Enter A {0} x {1} matrix", n, m);
        for (int i = 0; i < n; i++)
        {
          for (int j = 0; j < m; j++)
          {
            var input = Console.ReadLine();
            try
            {
              matrix[i, j] = int.Parse(input);
            }
    
            catch (System.Exception ex)
            {
              Console.WriteLine("Invalid input !!");
            }
          }
        }
    
        return matrix;
      }
    
      //Input of Second Matrix
      public int[, ] GetMatrixB(int n, int m)
      {
        this.n = n;
        this.m = m;
    
        int[, ] matrix = new int[n, m];
        Console.WriteLine("Enter B {0} x {1} matrix", n, m);
        for (int i = 0; i < n; i++)
        {
          for (int j = 0; j < m; j++)
          {
            var input = Console.ReadLine();
            try
            {
              matrix[i, j] = int.Parse(input);
            }
    
            catch (System.Exception ex)
            {
              Console.WriteLine("Invalid input !!");
            }
          }
        }
    
        return matrix;
      }
    
      //Subtraction of two Matrices
      public int[, ] SubMatrix(int[, ] a, int[, ] b)
      {
        int[, ] result = new int[n, m];
        for (int i = 0; i < n; i++)
        {
          for (int j = 0; j < m; j++)
          {
            result[i, j] = a[i, j] - b[i, j];
          }
        }
    
        return result;
      }
    
     	//Displaying the result
      public void DisplayMatrix(int[, ] matrix)
      {
        for (int i = 0; i < n; i++)
        {
          for (int j = 0; j < m; j++)
          {
            Console.Write(matrix[i, j] + "\t");
          }
    
          Console.WriteLine("");
        }
      }
    }
    
    class Program
    {
      static void Main(string[] s)
      {
        MatrixSubtraction matrix = new MatrixSubtraction();
    
        int m, n;
        Console.WriteLine("Enter Number Of Rows And Columns(must be square matrix) : ");
        m = Convert.ToInt16(Console.ReadLine());
        n = Convert.ToInt16(Console.ReadLine());
    
        int[, ] a = matrix.GetMatrixA(m, n);
        int[, ] b = matrix.GetMatrixB(m, n);
    
        Console.WriteLine("Result of A - B:");
        matrix.DisplayMatrix(matrix.SubMatrix(a, b));
    
      }
    }

    The output of matrix Subtraction in C#.


  • C# Program for Pass by Value

    This article shows the use of pass by value in C#. You may go through the following theory on pass by value in C#, click the link below.

    The program has a variable num value which is passed to the method square() as an argument. This calculates and displays the results in it.


    C# Program to implement Pass by Value

    Source code: C# program to implement call by value

    using System;
    
    class passByValue
    {
      static void square(int a)
      {
        a = a * a;
        Console.WriteLine("Value Within the Cube method : {0}", a);
      }
    
      static void Main()
      {
        int num = 10;
        Console.WriteLine("Value of num before the Method is called : {0}", num);
    
        // passing the value of num 
        square(num);
    
        Console.WriteLine("Value of num after the Method is called : {0}", num);
        Console.ReadKey();
      }
    }

    Output:


  • C# Program to check whether a Number is Even or Odd

    This article of C# Program checks if a given integer is Odd or Even, we have used the Ternary Operator (?:) and also seen the use of try and catch block.

    Explanation:
    The user enters the number that needs to be check for odd or even numbers. Here the entered number is checked with i % 2 == 0, that is if after the divisibility of an entered number by 2, the remainder is zero then it is an Even number but if the remainder is not zero then the entered number is an Odd number.


    C# Program to check whether the entered Number is Even or Odd.

    Source Code: C# odd or even program

    using System;
    
    public class EvenOdd
    {
      public bool isEven(int i)
      {
        return (i % 2 == 0);
      }
    }
    
    public class Program
    {
      public static void Main(string[] arg)
      {
        Console.WriteLine("Enter a number to check even or odd:");
        var i = Console.ReadLine().ToString();
        
        try
        {
          var n = int.Parse(i);
          EvenOdd obj = new EvenOdd();
          Console.WriteLine(obj.isEven(n) ? "Number is Even" : "Number is Odd");
        }
    
        catch (System.Exception ex)
        {
          Console.WriteLine("Invalid String Format!!");
        }
      }
    }

    Output:

    C sharp odd and even number