The java program below uses Math.PI property of java that returns approx 3.14159. The program takes the user input for the value of radius and calculates using the formula of Area and Circumference of a circle and displays the output accordingly.
Java Program to Calculate the Area and Circumference of a Circle
 //Area and circumference of circle

 import java.util.Scanner;

 public class AreaCircumCircle
 {

   public static void main(String args[])
   {
     Scanner sc = new Scanner(System.in);
     System.out.print("Enter the radius: ");

     double radius = sc.nextDouble();

     //Area = PI*radius*radius
     double area = Math.PI * (radius * radius);
     System.out.println("The area of a circle is: " + area);

     //Circumference = 2*PI*radius
     double circumference= Math.PI * 2*radius;
     System.out.println( "The circumference of a circle is:"+circumference) ;
   }
 }
Output:
Enter the radius: 7
The area of a circle is: 153.93804002589985
The circumference of a circle is:43.982297150257104
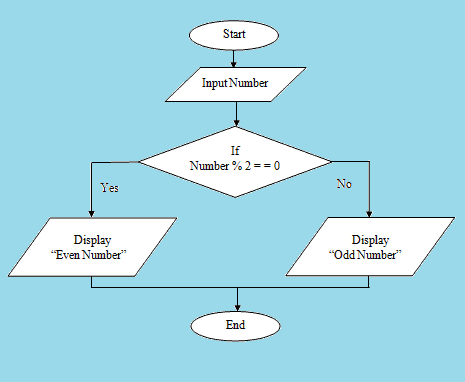
Here, you will learn to check the number taken from the user as an input using a scanner is Odd or Even. After checking display the result accordingly.
The concept of checking the number using the Modulus operator. First, calculate the number by modulus by 2, and if the Number mod 2 is equal to 0 then it is an even number else not.
Flowchart for odd or even number
Java Program to Check whether the Number is Odd or Even
 //check the number for odd and even

 import java.util.Scanner;

 public class CheckEvenOdd
 {
    public static void main(String[] args)
    {
        Scanner sc = new Scanner(System.in);

        System.out.print("Enter an integer: ");
        int num = sc.nextInt();

        if(num % 2 == 0)
            System.out.println(num + " is even");
        else
            System.out.println(num + " is odd");
    }
 }
The example below shows how to take two integers as an input from the user using Scanner and multiply them and display the final result on the screen in Java.
Before that, if you do not about the operators in Java, click the link below and learn about it.
//product of two numbers

 import java.util.Scanner;

 public class ProductOfTwoNumbers
 {
    public static void main(String[] args)
    {
        Scanner scan = new Scanner(System.in);
        System.out.print("Enter first number: ");

        // reads the input number
        int num1 = scan.nextInt();

        System.out.print("Enter second number: ");
        int num2 = scan.nextInt();

        // Closing Scanner after the use
        scan.close();

        // product of two numbers
        int product = num1*num2;

        // Displaying the result
        System.out.println("Product of two numbers is: "+product);
    }
 }
Output:
 Enter first number: 7
 Enter second number: 7
 Product of two numbers is: 49
//Addition of two numbers

 public class AddTwoNumbers
 {

   public static void main(String[] args)
   {

     int num1 = 20, num2 = 30, sum;
     sum = num1 + num2; //adding two numbers

     //Display result
     System.out.println("Sum of num1 and num2: "+sum);
   }
}
Output:
Sum of num1 and num2: 50
Java Program for the Sum of two numbers using Scanner
The Scanner class is used to get the inputs from the users in Java programming. We need to import a scanner class at the beginning.
import java.util.Scanner;
public class AddTwoNumbers
{
  public static void main(String[] args)
  {
    int num1, num2, sum;
    Scanner sc = new Scanner(System.in);

    //Taking Inputs from Users
    System.out.println("Enter First Number: ");
    num1 = sc.nextInt();
    System.out.println("Enter Second Number: ");
    num2 = sc.nextInt();

    sc.close();
    sum = num1 + num2;
    System.out.println("Sum of these numbers: " + sum);
  }
}
Output:
Enter First Number:
10
Enter Second Number:
5
Sum of these numbers: 15
Java file Class deals directly with the file and file system. That is, it is the abstract representation of file or directory pathname. It defines the properties of the file itself rather than describing how information is stored in or retrieved from files.
File class contains various methods for working with the pathname, deleting and renaming files, creation of new directories, and many more. A file object is created to manipulate with disk’s permissions, time, date, and directory path, etc.
Create File Object:
A File object is created as shown below,
File f = new File("/user/pusp/simple2code");
To create a file object, the following constructor can be used:
File(File parent, String child): Creates a new File instance from a parent abstract pathname and a child pathname string.
File(String pathname): Creates a new File instance by converting the given pathname string into an abstract pathname.
File(String parent, String child): Creates a new File instance from a parent pathname string and a child pathname string.
File(URI uri): Creates a new File instance, URI into an abstract pathname.
Some Useful Methods:
static File createTempFile(String prefix, String suffix): This method is used to create an empty file in the default temporary-file directory.
boolean canRead(): This method is used to test whether the application can read the file denoted by this abstract pathname.
boolean canWrite(): This method is used to test whether the application can modify the file denoted by this abstract pathname.
boolean delete(): This method is used to delete the file or directory denoted by this abstract pathname.
boolean createNewFile(): This method is used for atomically creating a new, empty file named by this abstract pathname.
boolean canExecute(): Method is used to test whether the application can execute the file denoted by this abstract pathname.
boolean isDirectory(): Method is used to test whether the file denoted by this pathname is a directory.
boolean isFile(): Method is used to test whether the file denoted by this abstract pathname is a normal file.
String getName(): Method is used to return the name of the file or directory denoted by this abstract pathname.
String getParent(): Method is used to return the pathname string of this abstract pathname’s parent.
boolean mkdir(): Method is used to create the directory named by this abstract pathname.
URI toURI(): Method is used to construct a file URI that represents this abstract pathname.
File[] listFiles(): Method is used to return an array of abstract pathnames denoting the files in the directory.
Java Program example to demonstrate Files Class
To check whether the new file is created or it already exists:
 import java.io.*;

  public class FileCreated
  {
   public static void main(String[] args)
   {

    try {
    File file = new File("javaCode.txt");
    if (file.createNewFile()) {
        System.out.println("New File is created.");
    } else {
        System.out.println("File already exists.");
    }
    } catch (IOException e) {
      e.printStackTrace();
    }

   }
  }
Output:
New File is created.
A new text file named ‘javaCode.txt‘ will be created at the same directory where you saved the java file.
Java Input/Output is used for processing input and giving out output. The package java.io contains all the required classes needed for input/output operation. Java uses the term stream for the representation of I/O operation.
Stream
A stream is a sequence of data. A stream supports many data such as primitives, objects, localized characters, objects, etc. Java’s stream-based I/O is built upon four abstract classes: InputStream, OutputStream, Reader, and Writer.
The two types of stream, we will be looking at are:
Byte Stream
Character Stream
Byte stream :
The byte stream classes provide a convenient means for handling byte-oriented I/O. The byte stream classes are topped by InputStream and OutputStream among many other classes.
InputStream:
InputStream is an abstract class that defines Java’s model of streaming byte input. It implements the Closeable interface.
Some of the methods defined by InputStream are:
int available(): Returns the number of bytes of input currently available for reading.
void close(): Closes the input source. Further read attempts will generate an IOException.
void mark(int numBytes): Places a mark at the current point in the input stream that will remain valid until numBytes bytes are ready.
int read(): Returns an integer representation of the next available byte of input. –1 is returned when the end of the file is encountered.
int read(byte buffer[], int offset, int numBytes): Attempts to read up to numBytes bytes into the buffer starting at buffer [ offset ], returning the number of bytes successfully read. –1 is returned when the end of the file is encountered.
void reset(): Resets the input pointer to the previously set mark.
OutputStream:
OutputStream is an abstract class that defines streaming byte output. It implements the Closeable and Flushable interfaces.
Some of the methods defined by OutputStream:
void close(): Closes the output stream.
void flush(): Finalizes the output state so that any buffers are cleared. That is, it flushes the output buffers.
void write(byte buffer[]): Writes a complete array of bytes to an output stream.
void write(int b): Writes a single byte to an output stream.
FileInputStream:
The File InputStream class creates an InputStream that you can use to read bytes from a file. These streams of raw bytes include image data, audio, video, etc.
FileOutputStream:
FileOutputStream creates an OutputStream that you can use to write bytes to a file.
Character Stream:
These streams are used to perform for a 16-bit Unicode. It provides a convenient means for handling the input and output of characters. At the top of the character stream hierarchies are the Reader and Writer abstract classes.
Reader:
Reader is an abstract class that defines Java’s model for reading character stream. It implements the Closeable(close()) and Readable (read(char[], int, int)) interfaces. All of the methods in this class will throw an IOException on error conditions.
Some of the methods defined by Reader:
abstract void close(): Closes the input source.
void mark(int numChars): Places a mark at the current point in the input stream that will remain valid until numChars characters are read.
boolean markSupported(): Returns true if mark()/reset() are supported on this stream.
int read(): Returns an integer representation of the next available character from the invoking input stream. –1 is returned when the end of the file is encountered.
int read(char buffer[]): Attempts to read up to buffer. length characters into buffer and returns the actual number of characters that were successfully read. –1 is returned when the end of the file is encountered.
boolean ready() Returns true if the next input request will not wait. Otherwise, it returns false.
void reset(): Resets the input pointer to the previously set mark.
Writer:
Writer is an abstract class that defines Java’s model for writing character stream. It implementsthe Closeable(close()), Flushable(flush()) and Appendable(char[], int, int) interfaces.
Some of the methods defined by Writer:
Writer append(char c): Appends c to the end of the invoking output stream. Returns a reference to the invoking stream.
abstract void close(): Closes the output stream.
abstract void flush(): Finalizes the output state so that any buffers are cleared. That is, it flushes the output buffers.
void write(int ch): Returns an integer representation of the next available character from the invoking input stream. –1 is returned when the end of the file is encountered. Writes a single character to the invoking output stream.
Writer append(CharSequence chars): Appends chars to the end of the invoking output stream. Returns a reference to the invoking stream.
FileReader:
For the reading purposes present on the file, the FileReader creates a class call Reader. It returns data in byte format like FileInputStream class.
Two commonly used constructor in FileReader are
FileReader(String filePath)
FileReader(File fileObj)
Methods used in FileReader:
int read(): return a character in ASCII form, returns -1 at the end of file.
void close(): close the FileReader class.
Example: Java program for File I/O.
The following example is to read lines and print these to the standard output stream from a file. The source file must be in the current directory.
import java.io.*;

  class FileReader
  {
   public static void main(String args[]) throws IOException
   {

    FileReader fr=new FileReader("fileTest.txt");
    int i;
    while((i=fr.read())!=-1)
    {
     System.out.print((char)i);
    }
    fr.close();
   }
  }
We have the following text in “fileTest.txt“:
Welcome to Simple 2 Code
Output:
Welcome to Simple 2 Code
FileWriter:
For the writing purposes present on the file, the FileWriter creates a class call Reader. It returns data in byte format like FileOutputStream class.
Four commonly used constructors in FileWriter are:
FileWriter(String filePath)
FileWriter(String filePath, boolean append)
FileWriter(File fileObj)
FileWriter(File fileObj, boolean append)
Methods used in FileWriter:
void write(String text): to write the string into FileWriter.
void write(char c): to write the char into FileWriter.
void write(char[] c): to write char array into FileWriter.
void flush(): to flushes the data of FileWriters.
void close(): to close the FileWriter.
Example: Java program for File I/O.
The following example is to write lines and print these to the standard output stream from a file. The source file must be in the current directory.
 import java.io.FileWriter;

  public class FileWriter
  {
   public static void main(String args[])
   {
    try{
    FileWriter f = new FileWriter("WriterTest.txt");
    f.write("Welcome to Simple2Code.");
    f.close();

   }catch(Exception e){
     System.out.println(e);
    }
   System.out.println("Done");
   }
  }
Output:
Done
Now check the text file, “WriterTest.txt” in the same directory.
Welcome to Simple2Code.
Example: Use of BufferReader in Java
 import java.io.*;

  class FileReaderBuffer
  {
   public static void main(String args[]) throws IOException
   {
    FileReader fr = new FileReader("FileReaderDemo.java");
    BufferedReader br = new BufferedReader(fr);
    String s;
    while((s = br.readLine()) != null)
    {
     System.out.println(s);
    }
    fr.close();
   }
  }
The applet in Java is a special type of internet-based program, that runs on the web browser and works at the client-side. It is used to make the webpage more dynamic and provide interactive features that cannot be applied by the HTML alone.
Any applet in Java is a class that extends the java.applet.Applet class.
An Applet class does not contain the main() method.
JVM(Java Virtual Machine) is needed to view an applet. To run an applet application, the JVM can use either a plug-in of the Web browser or a separate runtime environment.
Some of the benefits of using Java Applet:
It is secured. It runs in Sandbox which is a Byte-code verifier.
Since it works at the client side so less response time.
It can be executed by the browsers that are running under any platform.
One of the Drawbacks of Java Applet is that for executing applets, plugins are required at the client browser.
Life Cycle of a Java Applet
Java Appplet
The various stages that an Applet undergoes from its creation to its destruction of objects is known as the Applet life cycle.
Applet life cycle consists of 5 states and each of the states is a signified method and called callback methods.
Following are the states in Applet:
init() method: This method is used for the initialization of an Applet. It is only executed once in a program.
start() method: This method is used to start the Applet and called automatically after the JVM calls init() method. It can be called repeatedly.
paint() method: This method is called immediately after the start(). It is inherited from java.awt, used to paint the object providing the graphic class object.
stop() method: This method is called automatically to stop the Applet. It can also be called repeatedly in the same applet.
destroy() method: This method is used to destroy the Applet and also executed only once in the program.
Applet Class:
All the Applet present is an extension of the java.applet.Applet class. These classes are necessary for the execution of an applet. They include various methods for the applet such as methods to fetch and display images and play an audio clip, resize an applet, to get applet parameters, etc.
Demonstrate a simple Applet example in Java.
 import java.applet.Applet;
  import java.awt.Graphics;
  public class FirstApplet extends Applet
  {
   public void paint(Graphics g)
   {
    g.drawString("First Applet Program", 20, 15);
   }
  }
After saving this code with ‘FirstApplet.java‘. We need to create an HTML file to include this applet. Create an HTML file named first.html within the same folder where you have saved the FirstApplet.java.
<html>

  <head>
    <TITLE> A Simple First Program </TITLE>
  </head>

  <body>
    The output:

  </body>

  </html>
Display Methods in Applet:
As we know applet is displayed in a window and for the input/output operations, they use AWT. To output a string, we use drawString().
The general form for drawString():
void drawString(String message, int x, int y)
In the above form, this method is written, beginning at x,y which is the location we want the line to begin. This is a graphics class.
To set a background color of an applet’s window, we use setBackground().
To set the foreground color, we use setForeground().
The general form of setBackground() and setForeground() are:
 void setBackground(Color newColor)
 void setForeground(Color newColor)
 //Here "newColor" denotes the new color.
The class Color defines the constants shown here that can be used to specify colors:
Color.black
Color.blue
Color.cyan
Color.darkGray
Color.gray
Color.green
Color.lightGray
Color.magenta
Color.orange
Color.pink
Color.red
Color.white
Color.yellow
The following shows the source code on how to display background color.
An exception in Java is an event that arises during the execution of a program i.e. during run–time. The occurrence of an exception in a program disrupts the normal flow of instructions. This causes the termination of the program or application and therefore needs to be handled by calling an exceptionhandler, which deals with the exception.
An exception may occur for the invalid user input, or the files that need to be opened cannot be found., or loss of network connection.
Exception handling is a mechanism to maintain the normal flow of a program by handling runtime errors. The main advantage of exception handling is to ensure that even when an exception occurs, the program’s flow doesn’t break.
Type of exception in Java:
Checked: Checked Exceptions are also known as compile-time exceptions. These exceptions are checked by the compiler during compile-time. If a checked exception is found within the method then the method must be handled by try and catch or must declare an exception by throws keyword. These exceptions are not to be ignored. Some of the checked Exceptions occur are SQLException, IOException, ClassNotFoundException, etc.
Unchecked Exception: Unchecked Exceptions are also known as run-time exceptions. These exceptions occur during the time of execution of a program that is at run-time. These exceptions are not checked during compilation. Some of the Unchecked Exceptions occur are ArithmeticException, NullPointerException, ArrayIndexOutOfBoundsException, etc.
Error: Errors are not an exception but are the problem that a user or programmer cannot handle. We can say that these are irrecoverable such as VirtualMachineError, OutOfMemoryError, AssertionError, etc.
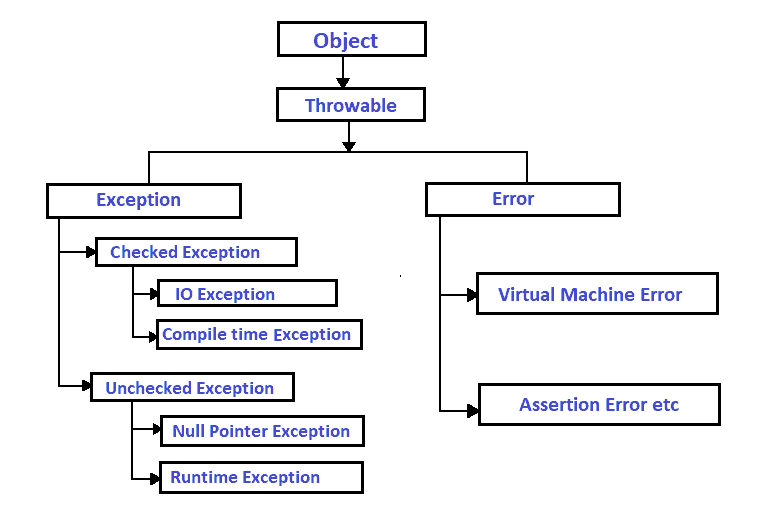
Exception Hierarchy:
All exception classes are subtypes of the java.lang.Exception class. The exception types and errors are the subclasses of the Throwable class. Furthermore, they are also divided into a runtime exception and other exceptions as shown in the figure.
Exception Hierarchy
Handling Exception in Java:
Exception in Java is handled using five keywords:
1. try 2. catch 3. throw 4. throws 5. finally.
Try-Catch:
This is one of the common ways to handle the exception. The combination of try and catch keyword is used in a method to catch an exception. The try block contains the exception code and the catch block is used to handle the exception if it occurs in the try block.
Syntax for try-catch block:
 try
  {
  //  Block of exception code
  }
  catch(Exception e)
  {
  //  Block of code to handle exception
  }
Example: Java program to demonstrate try-catch:
Let us see it in an example, where the code tries to try to access the fourth element in an array that has only 3 elements:
 public class TryCatchTest
  {
    public static void main(String args[])
    {
      try
      {
        int a[] = new int[3];
        System.out.println("Accessing element four :" + a[4]);
      } catch (Exception e) {
      System.out.println("Not Found");
      }

    }
  }
Output:
Not Found
Java Multiple Catch Block:
The code having multiple catch blocks which are followed by a try block. If there are different exceptions then each block of multiple catches must contain different exception handlers. Also, one catch block is executed at a time.
Example: Java program to demonstrate the Multiple catch block:
 public class MultipleCatchTest
  {
   public static void main(String[] args)
   {

    try
    {
      int a[]=new int[5];
      a[5]=30/0;
    }
    catch(ArithmeticException e)
    {
      System.out.println("Arithmetic Exception occurs");
    }
    catch(ArrayIndexOutOfBoundsException e)
    {
      System.out.println("ArrayIndexOutOfBounds Exception occurs");
    }

   }
  }
Output:
Arithmetic Exception occurs
Throw:
The throw keyword in Java is used to explicitly throw an exception from any block of code. throw keyword allows us to create a custom error or throw a custom exception.
Syntax of throw keyword:
throw new exception_type("error message");
For example, we can throw ArithmeticException when we divide the number by 3, or any other numbers, we only need to do is set the condition and throw an exception using throw keyword. Such as:
throw new ArithmeticException("cannot divide a number by 3");
Example: Java Program to demonstrate throw:
Let us see it in a program: Check for roll no. greater than 12, if true then allowed and if not then not allowed.
 public class ThrowTest
  {
   static void checkRollNo(int roll)
   {
    if (roll < 12)
    {
      throw new ArithmeticException("Not Allowed to Enter.");
    }
    else {
      System.out.println("Allowed to Enter");
    }
   }

   public static void main(String[] args)
   {
    checkRollNo(10);
   }
  }
Output:
Exception in thread "main" java.lang.ArithmeticException: Not Allowed to Enter.
          at ThrowTest.checkRollNo(ThrowTest.java:7)
          at ThrowTest.main(ThrowTest.java:16)
Throws
throws keyword in java is used to declare an exception. It indicates that the method may throw an exception and it’s better to handle the exception using a try-catch block to maintain the normal flow of the program.
import java.io.IOException;
public class ThrowsTest
{
  void method1()throws IOException
  {
    throw new IOException("Error");//checked exception
  }
  void method2()throws IOException
  {
    method1();
  }
  void method3()
  {
   try{
    method2();
   }catch(Exception e)
   {
       System.out.println("exception is handled");
   }
  }
  public static void main(String args[])
  {
   ThrowsTest obj=new ThrowsTest();
   obj.method3();
   System.out.println("normal flow maintained");
  }
}
Output:
exception is handled normal flow maintained
Finally
Finally block is used to execute the code followed by the try-catch block. finally block is always executed whether an exception is handled or not. This block appears at the end of the catch block.
An event is an object that describes the change of state in a source. It is the changes made within the GUI(Graphical User Interface). The activities that cause the event to be generated are the pressing of a button, selecting items, input the information, clicking of the mouse, etc, basically all the interaction with GUI.
Two types of Event:
Foreground Events: It is the clicking of a mouse, pressing the button, input character from the keyboard. scrolling of the page etc. That is, these are events where the user is to interact directly with the GUI.
Background Events: The end-user interaction is seen in this type of event such as OS interruption, the timer expires, operation completion, etc. This is not directly caused by interactions with a user interface.
Event Handling:
It is a mechanism that handles all the events occurring and also controls the further process when an event occurs. To handle the events, Java uses the Delegation Event Model.
Let us learn about the Delegation Event Model.
Delegation Event Model:
This model in Java is a new approach to handle the events. It is the standard and consistent way to Handle the events generated by the interaction with GUI components.
The terms used:
Event Source: A source is an object that generates a specific kind of event. This may be the GUI component such as button list, Window, etc. Source provides data of the event that is occurred to the handler. A listener gets notified about the type of event that occurred and for that source must register a listener. The general form to register the listener to an event source is: publicvoid addTypeListener(TypeEvent e) Here, Type is the name of the event and e is the reference of the event listener.
Event Listener: A listener is an object that gets notified when an event occurs. In order to get notified, it must be registered to one or more event sources, and also it must implement methods to be able to receive and process it. These methods in Listener is found in, or need to import: import java.awt.event.*;
Process: Once the listener is registered, it waits for the event to occur. And when an event occurs, the source object is created and notified to the listener by the listener methods. Then, when the listener receives that object from the source, it executes the event and returns.
Event Class:
Java provides a number of event classes. Some of them are:
ActionEvent: It is the easiest and most common event occurring. To write an Action Listener extends a class AWTEvent. Example: when a button is pressed, the item in a list is double-clicked, etc.
KeyEvent: It extends a class InputEvent. It has three methods in the Listener interface. public void keyTyped(KeyEvent e) {active when typed} public void KeyPressed(KeyEvent e) {active when pressed} public void KeyReleased(KeyEvent e) {active when released}
MouseEvent: It extends a class InputEvent. It has 5 methods. It is instantiated when a mouse button is pressed, released, or clicked, or when a mouse cursor enters or exits a visible part of a component.
WindowEvent: It extends a class InputEvent. It provides 8 methods. Starts from when a Window object is opened, closed, activated, deactivated, iconified, deiconified, or gain or loss of Window Focus.
TextEvent: It extends a class AWTEvent. This class is instantiated when the text value or text area is changed.
ItemEvent: It extends AWtEvent. And instantiated when an item or from a list or a checkbox is selected or deselected.
There are more event class such as ComponentEvent, InputEvent, FocusEvent, MouseMotionEvent etc.
EventListener Interfaces:
EventListener Interface class is defined by the java.util.package. It is an interface where every listener interface has to be extended.
Class Declaration:
The Following shows the declaration for java.util.EventListener interface:
public interface EventListener
AWT Event Listener Interfaces:
The most commonly used event Listeners are:
ActionListener: used for receiving the action events.
AdjustmentListener: used for receiving the adjustment events.
ComponentListener: used to define when a component is hidden, moved, resized, or shown.
Focus Listener: used for receiving the focus events such as when a component loses or gains keyboard focus.
KeyListener: used for receiving the key events such as the state of pressed, released, or typed.
TextListener: used to receive text events like when the value of text changes.
MouseMotionListener: used to receive the mouse motion events like when the mouse is moved or dragged.
ContainerListener: used to receive container events like the addition or removal of the component from the container.
WindowListener: used to receive window events such as window activation, deactivation, closed, opened or exit.
MouseListener: used to receive mouse events such as clicking, pressed or released, etc.
ItemListener: used to receive the item events that is the state of change of items.